Hardwood floors are a beautiful addition to any home. But installing them can be tricky, and there are a few important steps you should take before starting the project.
The number one issue that can lead to problems with your hardwood flooring is moisture. Moisture can cause buckling, cupping, and gapping.
Remove All Furniture
One of the most important steps before you can begin installing your new hardwood floors is removing all your furniture from the room. The reason for this is that removing your furniture will allow the installers full access to the room and minimize any dust that may make it into your living space.
The most obvious way to accomplish this is by hiring a professional to come and do it for you. They will have all the necessary equipment to ensure your room is ready for floor-cover installation.
Depending on the type of wood being installed, you will need to leave the flooring to dry out for up to 48 hours before putting furniture back onto it. If you’re installing a polyurethane or protective coating, that can take even longer.
As a result, you will want to move your furniture as quickly and efficiently as possible so that the installation process goes as smoothly as possible. The best way to do this is using a dolly and some quarter-inch plywood or Masonite.
While you’re at it, you might as well do a little research and find out which wood species are the most durable and which are the most affordable. This information will help you determine which type of flooring is right for you and will also give you a clear picture of what you can expect from your investment. If you aren’t sure, ask for advice from a trusted flooring professional before deciding on which type of wood is the best choice for your home.
Clear the Area
One of the most important steps to take before installing hardwood floors is to clear the area of anything that might fall on the flooring. This includes things like home decor, furniture, and lighting fixtures. It also means removing any artwork, mirrors, or family photos that are on the wall.
Another thing to consider is the weather. Wood floors are more susceptible to damage from sunlight, especially if they aren’t sealed properly. Therefore, it’s best to keep doors closed and avoid direct sunlight as much as possible.
In addition, make sure there’s no dust build-up by cleaning the floors at least once a week. This will help to prevent the accumulation of dust, dirt, and debris that can cause scratches and scuffs.
It’s also essential to use a broom or a dust mop on the floors as often as necessary to ensure they stay clean. This will help to eliminate any allergens and pet dander that might have accumulated in the flooring.
As mentioned before, removing any items that could potentially scratch the floor, such as sharp furniture claws and shoes is also a good idea. This will help to keep your floors looking their best for years to come!
You’ll want to ensure the color of your new wood floors matches any existing colors in your room. This is important to make the space feel cohesive and flow together, as opposed to feeling like an afterthought.
It’s also a good idea to choose the right type of wood. Engineered wood is a popular choice for many homeowners, as it looks like a sandwich with a wood veneer on top and multiple layers of compressed wood underneath. Alternatively, you can choose a solid-wood plank for a more traditional look.
Install a Dust Containment System
Hardwood floors can create an enormous amount of dust during the sanding and finishing process. Whether it is from a floor sander or an edger, this dust gets everywhere and can be very unhealthy for your workers.
A proper dust containment system is a great way to protect your employees and customers from this harmful dust. It also allows you to finish your projects faster and produce better results.
While a dust containment system is essential for any wood flooring contractor, it is especially important for those who install hardwood floors in homes. This is because it will help prevent the buildup of dust that can lead to unhappy customers.
Sanding and refinishing hardwood floors is one of the dustiest jobs in the world, so it is important to ensure your work area is protected. This can be done with a dust containment system or even just using plastic sheeting and tape to create a temporary barrier.
Depending on your situation, you may want to choose a dust containment system with specific features to help ensure that you are getting the best protection possible. For instance, a dust containment system with an integrated negative air machine and filtration will protect your workers and the surrounding environment the most.
Another great feature to look for in a dust containment system is a door lock and windows for visibility. This makes it easy for you to keep the area safe while still allowing you to see what you are doing inside.
Choosing a dust containment unit with a clean, professional appearance can also help you foster trust with your clients. Those who know that you care about the safety of your work environment will be more likely to hire you again and recommend your services to others.
Clean the Subfloor
One of the most important steps before installing hardwood floors is thoroughly cleaning the subfloor. This will ensure the surface is clean, level, and mold-free before laying the floor.
This is important because the subfloor is the foundation for your flooring, and a dirty or poorly prepared surface can cause damage to your new floor. It can also lead to unwanted sounds and sagging, which can result in higher maintenance costs down the road.
You can clean the subfloor with a standard mop or with a shop vac. Make sure you vacuum out all of the old staples and nails and any other dirt or debris that may have accumulated on the floor.
Alternatively, you can mix one part bleach or hydrogen peroxide with three parts water and use this solution to clean the subfloor. Just be careful not to get too much water on the wood because this can cause moisture damage to the floor.
Remove all stains and smells from the subfloor before laying down your new floors, especially if you plan to install them in an area with pets or heavy traffic. Using an enzymatic cleaner will help to neutralize pet urine, oil, blood, wine, and other odors that can be present on the subfloor.
You should also use a moisture meter to test the moisture levels of the subfloor and joists. Check the manufacturer’s instructions and follow them closely to ensure the subfloor is properly dry before laying your floors.
Prep the Room
Before you and the pros move in to start installing the floors, a few things need to be done. First, all the furniture needs to be removed from the room so that the flooring installers have room to work safely and effectively.
The next step is to remove all items that could break, such as artwork and mirrors hung on the walls. Also, any long window treatments that can get in the way of the installation process need to be taken down.
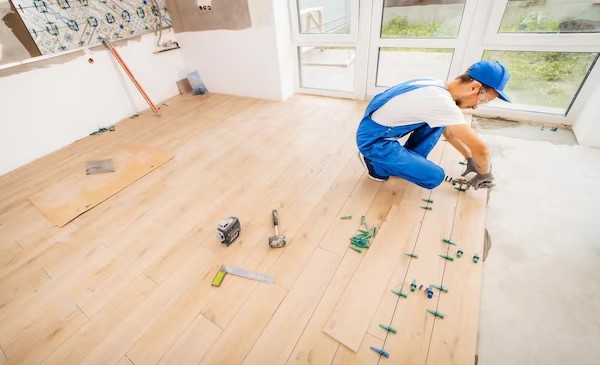
Once the room is cleared, you can begin your hardwood floor installation. Depending on the type of floor you choose, there are three methods for installation: floating, nail-down, and glue.
Floating is the easiest of the three methods. It does require nails, but it can be easily installed over vinyl surfaces and is recommended for most DIYers.
Nail-down is one of the more common methods, but it requires a bit more skill. It is typically used in high-traffic areas, like kitchens and bathrooms.
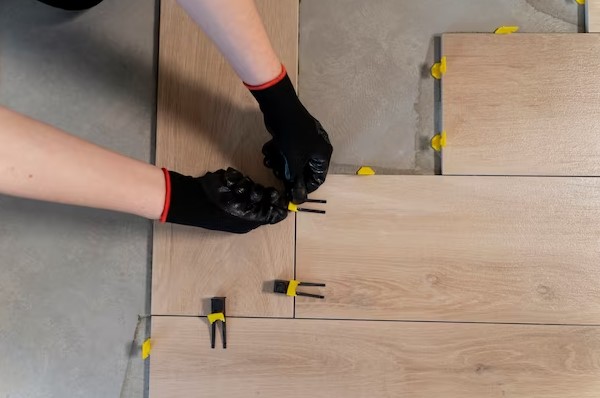
To install this method, place spacers between the wall and your first row of planks to create a perimeter that leaves a 1/4″ expansion gap. Pre-drill and nail your first row of planks, then drive staples at a 45-degree angle right above the tongue of the board, every 3-4 inches along the length of each plank.
The last few rows will be too close to the wall to use a pneumatic stapler, so you can either use a pull bar to pull the boards into place or face-nail them down. You can also stagger the ends of your end rows to give them a more natural wood look.